Understanding Finish Trim: Types and Styles
Finish trim plays a pivotal role in defining the aesthetic and functional qualities of interior spaces. It encompasses various moldings, baseboards, casings, and decorative woodwork that enclose or transition between surfaces, adding depth, style, and refinement to rooms. Whether in a new construction or renovation project, selecting and installing the right Finish trim is essential to achieving a polished, professional look. This comprehensive guide explores the varied types and styles of finish trim, their materials, design considerations, and how they elevate interior architecture.
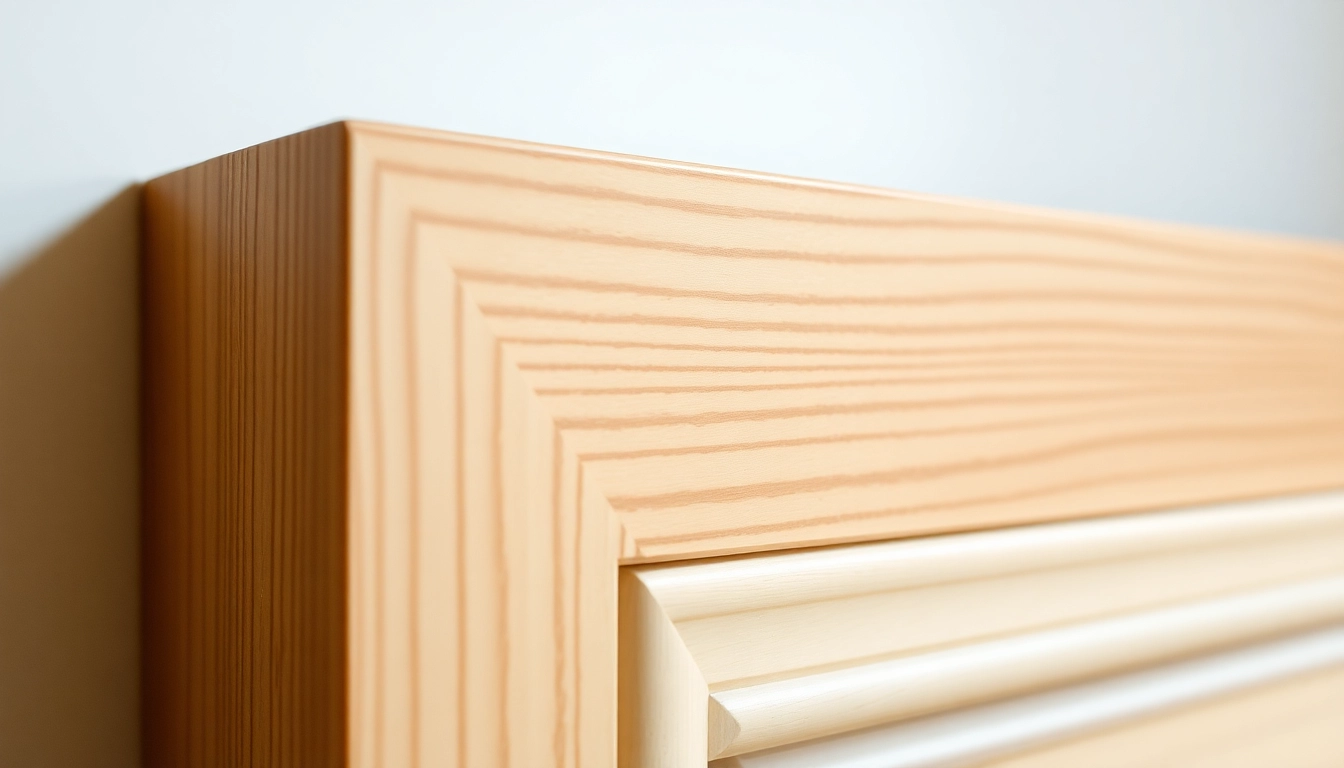
Common Materials Used in Finish Trim
The choice of material greatly influences the durability, aesthetics, and cost of your finish trim. The most prevalent materials include:
- Wood: Traditional and versatile, wood trim offers authentic warmth and can be stained, painted, or left natural. Common species include pine, oak, maple, and maple. Pine is budget-friendly and easy to work with, ideal for DIY projects and intricate profiles. Hardwoods like oak provide durability and a premium appearance, suitable for high-traffic areas.
- Medium-Density Fiberboard (MDF): MDF is a cost-effective, smooth material that accepts paint well and resists warping. It’s ideal for painted finishes but less suitable for moisture-prone areas unless primed and sealed properly.
- PVC and Vinyl: These synthetic options are moisture-resistant and perfect for bathrooms, kitchens, and outdoor applications. They come in various profiles and can imitate wood grain but often have a different tactile feel.
- Composite and Foam Trims: Lightweight and easy to install, these materials are popular for decorative trims, especially in renovation projects due to their ease of handling and affordability.
When selecting materials, consider factors such as exposure to moisture, required durability, desired finish, and budget constraints. High-quality finish trim not only enhances aesthetics but also withstands the test of time, making material choice crucial.
Popular Design Styles and Profiles
Finish trim encompasses a variety of profiles and styles, each creating distinctive visual effects and aligning with different architectural themes. Some common styles include:
- Colonial and Traditional: Features ornate, elaborate profiles with multiple layers, curves, and decorative motifs, ideal for classic and historical interior decors.
- Modern and Minimalist: Clean, straight lines with simple profiles, such as flat or beveled trims, complement contemporary design philosophies.
- Craftsman and Ranch: Simplified, sturdy profiles that emphasize functionality, often with squared or slightly rounded edges.
- Crown Molding: Installed where walls meet ceilings, crown molding adds elegance and height perception. Profiles range from simple cove designs to intricate egg-and-dart patterns.
- Baseboards: The lowest trim along the bottom of walls, baseboards come in various heights and profiles, from subtle beveled edges to bold, substantial designs.
- Casings and Door Trims: Frames around doors and windows, with styles like wide casing, colonial, or modern flat profiles, framing openings with finesse.
Selecting the appropriate profile depends on the architectural style, room proportions, and personal preference. Modern homes often favor minimal profiles, while traditional settings benefit from intricate designs.
How Finish Trim Enhances Interior Aesthetics
Finish trim serves as the final decorative touch that can transform a space from utilitarian to luxurious. It creates visual framing for walls, doors, and windows, emphasizing architectural details and providing a sense of completeness.
For example, well-chosen crown molding can add a sense of height and grandeur, making standard ceilings appear more elongated. Baseboards can anchor a room’s design, concealing imperfections where the wall meets the floor. Custom casings around windows and doors add character and can be styled to match the overall interior theme.
Additionally, finish trim helps in defining spatial boundaries, creating contrast, and highlighting architectural features. Its color, profile, and style contribute significantly to the room’s ambiance, whether warm and inviting or sleek and modern.
Step-by-Step Guide to Installing Finish Trim
Preparing Your Space for Finish Trim Installation
Proper preparation sets the stage for successful finish trim work. Begin by cleaning the installation area thoroughly, removing dust, debris, and any existing old trim or nails. Check the walls and ceilings for inconsistencies, gaps, or damage that might affect the installation.
Measure the perimeter of rooms, openings, and features accurately. Draft detailed plans and cut lists, especially if using profiles with complex shapes or multiple pieces. Acquiring quality tools—such as a miter saw, level, tape measure, nail gun, and adhesive—is essential for precision.
Use a level to ensure that the walls and surfaces are plumb and straight. If necessary, perform minor repairs or drywall work to create an even surface. This foundation minimizes gaps, overlaps, and misalignments during installation.
Measuring, Cutting, and Fitting with Precision
Accurate measurement is critical. Measure each wall length and angle before cutting. When mitring corners, use a miter saw set to the correct angle (typically 45 degrees). Remember to account for the internal or external corners and adjust your cuts accordingly.
For complex or irregular walls, use a cutting template or profile gauge to trace profiles directly on the trim. Cut the pieces slightly longer than measured, then trim to fit for tight joints. Test fit each piece before fastening to prevent errors.
Techniques such as butt joints, coped joints, or mitered corners depend on the profile and aesthetic desired. Coped joints, especially for crown molding or crown-like profiles, offer cleaner corners and minimize gaps.
Finishing Touches: Caulking, Sanding, and Painting
After secure fastening, conceal seams and gaps with high-quality painter’s caulk. Use a flexible, paintable caulk for movement and expansion. Smooth the caulk with a damp finger or tool for a seamless appearance.
Sand the edges and joints lightly with fine-grit sandpaper to eliminate ridges, tool marks, or rough spots. Wipe away dust before painting or staining.
For painted finish trim, prime the surfaces if necessary, then apply multiple coats of high-quality latex or oil-based paint for durability. Use a brush or roller for even coverage, paying attention to corners and intricate profiles.
Achieve a professional look by masking adjacent surfaces and employing detailed brushwork in tight areas. The final finish should be smooth, uniform, and free of brush marks or drips.
Best Practices for High-Quality Finish Trim
Choosing the Right Materials and Tools
Quality materials and tools directly impact the final appearance and longevity of your finish trim. Use precision saws, level tools, and clamps to ensure accurate cuts and secure fastening. Invest in good-quality nails or finish screws that match the trim’s weight and profile.
Select materials aligned with your aesthetic goals and environmental conditions. For high-traffic or moisture-prone areas, opt for moisture-resistant MDF or PVC, while for traditional warmth, natural hardwoods are preferable.
Proper tools—such as miter saws with adjustable angles, nail guns with depth adjustment, and fine sanders—streamline the process and improve quality.
Techniques for Seamless Joints and Corners
Precision in joints and corners elevates finish quality. Miter joints at 45 degrees create clean, seamless corners, but require exact measurement and cuts. Coping joints, where one piece is cut along the profile to fit closely against an adjoining piece, often produce better results with complex profiles or uneven walls.
When dealing with external corners, maximize contact of mating profiles to reduce gaps. Use shims or wedges if necessary to achieve perfect alignment before fastening.
Clamping during glue setting or caulking ensures tight joints. Finishing with filler, sanding, and touch-up paint will hide minor imperfections and produce a flawless appearance.
Proper Painting and Surface Preparation for a Flawless Look
Surface preparation enhances the adhesion and appearance of paint or stain. Sand all surfaces smoothly, paying particular attention to edges and profiles. Clean off dust before applying primer or paint.
For painted trim, use primers compatible with your paint type to ensure durability and color depth. Choose high-quality paints with appropriate sheen—matte, eggshell, satin, semi-gloss, or gloss—based on the room’s needs and aesthetic preferences.
Multiple thin coats outperform thick applications, resulting in even coverage and reduced brush or roller marks. Use fine brushes for detailed profiles and edges, ensuring a crisp, professional finish.
Common Challenges and How to Overcome Them
Dealing with Imperfections and Gaps
Gaps and mismatched joints are common in finish trim installations but can be mitigated through meticulous measurement and precise cuts. Use caulk to fill minor gaps and paint or stain them to match surrounding surfaces. Coped joints, in particular, should be shaped carefully to eliminate visible seams.
For larger imperfections, wood filler or plaster can be used to smooth out surface inconsistencies before painting. Sand thoroughly after the filler dries for an inconspicuous repair.
Maintaining Consistent Finish and Color Match
When painting or staining large areas or multiple runs, always use the same batch of material to ensure color consistency. Mix enough material before starting to prevent slight color variation.
Proper surface prep, such as using a uniform primer and applying subsequent coats systematically, ensures a consistent finish. Keep paint or stain containers sealed and protected from environmental changes to maintain color integrity.
Preventing Warping and Damage Over Time
Select moisture-resistant materials, especially in humid environments. Proper installation—securing trims firmly and avoiding excessive nails—reduces stress points that can cause warping or cracking.
Regular inspections and prompt repairs to chips, cracks, or gaps prolong the lifespan of finish trim. Cleaning with mild soap and avoiding abrasive cleaners help preserve the surface.
Maintaining and Caring for Finish Trim
Cleaning and Regular Inspection
Routine cleaning with a soft cloth or vacuum helps remove dust and dirt. For stubborn stains, use a damp cloth with mild detergent. Inspect trims periodically for signs of damage, such as chips, cracks, or warping.
Address minor issues promptly; repaint or retouch as needed to maintain the visual appeal and structural integrity.
Touch-Ups and Refinishing Tips
Small scratches or chips can be repaired with matching paint or stain. Sand the damaged area lightly, apply a compatible filler if necessary, then touch up with a small brush for seamless blending.
Refinishing may involve light sanding and re-painting or staining to refresh the look after years of wear. Use protective coatings, such as clear sealants, to enhance durability.
When to Replace or Upgrade Your Finish Trim
Over time, accumulated damage, warping, or outdated styles may necessitate replacement. Signs include persistent gaps, excessive cracking, or aesthetic mismatches with new design themes.
Upgrading allows you to incorporate modern profiles, higher-quality materials, or improved finishes. It can significantly enhance your interior’s value and visual coherence.